Illustrator Vectors by Stephanie.
Comtains 28 vectors for Photoshop 7+, Photoshop Elements 2+, GIMP 2.2.6+, Illustrator 8+, any vector program...
This set of Adobe Illustrator vectors composed of various splats and spatters of paint, blood, or any other liquid you’d like it to be. There are splats, splatters, and much more!
These are a lot like our Splats & Splatters Photoshop & GIMP brushes, but with different designs and in vector format.
These vectors come in several different formats. However, they come as:
* AI 8+ (which includes both AI and EPS files - made for Illustrator 8 and above)
* AI CS (which includes both AI and EPS files - made for Illustrator CS and above)
* SVG vector files
Download here
Saturday, April 23, 2011
8 Cloud Vector Photoshop Brushes
This set contains 8 cloud vector brushes for Photoshop.
Download here
Download here
Steampunk Gears
Author: Sarah Tonen
Website: www.sarahcarneycreative.com
Photoshop custom shapes: 10 in set
Date: Jan 10th 2011
File size: 12 KB
Downloads: 13094
Terms of use: free for personal and commercial use
Description:
10 Photoshop Customshapes - Steampunk Gears
download
Butterflies
Author: Gratiela Dascalu
Website: www.webdesignerlab.com
Photoshop custom shapes: 8 in set
Date: Feb 6th 2010
File size: 68 KB
Downloads: 43578
Terms of use: free for personal and commercial use
Description:
8 custom shapes representing butterflies, can be used with Photoshop CS3 and up.
download
Website: www.webdesignerlab.com
Photoshop custom shapes: 8 in set
Date: Feb 6th 2010
File size: 68 KB
Downloads: 43578
Terms of use: free for personal and commercial use
Description:
8 custom shapes representing butterflies, can be used with Photoshop CS3 and up.
download
Circles Shapes
Author: Aimha Design
Website: aimhadesign.carbonmade.com
Photoshop custom shapes: 12 in set
Date: Jan 21st 2009
File size: 2,2 MB
Downloads: 100362
Terms of use: free for personal and commercial use
Description:
Great pack of custom shapes, hope you enjoy it! It's mainly thought for background and stuff, you are free to use and abuse it as you like, I only ask you to if you download them. If you come up with something, make me know!(credit if used will be kind too)
download
Tags n' Ribbons
Author: StarSunflowerStudio
Website: starsunflowerstudio.blogspot.com
Photoshop custom shapes: 6 in set
Date: Mar 8th 2011
File size: 771 KB
Downloads: 6614
Terms of use: free for personal and commercial use
Description:
A lovely set of tag and ribbon PS Custom Shapes.
Download
Website: starsunflowerstudio.blogspot.com
Photoshop custom shapes: 6 in set
Date: Mar 8th 2011
File size: 771 KB
Downloads: 6614
Terms of use: free for personal and commercial use
Description:
A lovely set of tag and ribbon PS Custom Shapes.
Download
Create Pale looking face
In this tutorial you will learn how to create a pale looking face. This means the face colour will look whiter. For this tutorial I have used the dodge and sponge tools to create the pale effect. I have used a free stock image of a woman which is available from ww.sxc.hu. This process only require three simple steps
Create Pale looking face
Step 1
Open an image in Photoshop.

Step 2
Select the dodge tool with the range set at Midtones and the exposure at 50%. The dodge tool will create the white effect on the skin.

Now choose and appropriate brush size and paint over the face of the image. You image should look something like below:

Step 3
Select the sponge tool with the mode at Desaturate and the flow at 50%, and again paint over the face of the image.

You should now have a paler looking face.
Create Pale looking face
Step 1
Open an image in Photoshop.

Step 2
Select the dodge tool with the range set at Midtones and the exposure at 50%. The dodge tool will create the white effect on the skin.

Now choose and appropriate brush size and paint over the face of the image. You image should look something like below:

Step 3
Select the sponge tool with the mode at Desaturate and the flow at 50%, and again paint over the face of the image.

You should now have a paler looking face.
Stencil image effect
In this tutorial you will learn how to create a stencil image effect. This produces the results as if the image has been painted over with a cut out design. You need to use the image adjustment tools for this effect, and some knowledge of turning an image black and white is needed for this tutorial.
Stencil image effect
Step 1
Open an image in Photoshop you wish to add the stencil effect to.

Step 2
Remove the background from the image. You can use the extract tool or the eraser tool for this step depending on your image. I have used the eraser tool as there is not much background in the image.

Step 3
Convert your image into black and white by selecting Image > Adjustments > Desaturate. For more methods to turn your image black and white checkout this tutorial.
Step 4
Select Image > Adjustments > Brightness/Contrast and drag the contrast slider to +100, then drag the brightness slider to the right until you are happy with the final result. I have dragged the brightness value to +34. If you want less detail on your stencil effect you can give a higher brightness value, and if you want more detail you can reduce the brightness value.

You should now have a stencil image effect.
Stencil image effect
Step 1
Open an image in Photoshop you wish to add the stencil effect to.

Step 2
Remove the background from the image. You can use the extract tool or the eraser tool for this step depending on your image. I have used the eraser tool as there is not much background in the image.

Step 3
Convert your image into black and white by selecting Image > Adjustments > Desaturate. For more methods to turn your image black and white checkout this tutorial.
Step 4
Select Image > Adjustments > Brightness/Contrast and drag the contrast slider to +100, then drag the brightness slider to the right until you are happy with the final result. I have dragged the brightness value to +34. If you want less detail on your stencil effect you can give a higher brightness value, and if you want more detail you can reduce the brightness value.

You should now have a stencil image effect.
Transparent text effect
In this tutorial you will learn how to create a transparent text effect. This effect gives the illusion of see-through text and is very simple to create.
Step 1
Open an image in Photoshop and select the text tool and type your message on the image like below. I have used impact font type, but you can use whatever font you wish.

Step 2
Select Layer > Layer Styles > Blending Options. Check the bevel and emboss and add the follow settings.

Step 3
Finally, change the Fill of the text layer to 0%

You should now have a transparent text effect.

Step 1
Open an image in Photoshop and select the text tool and type your message on the image like below. I have used impact font type, but you can use whatever font you wish.

Step 2
Select Layer > Layer Styles > Blending Options. Check the bevel and emboss and add the follow settings.

Step 3
Finally, change the Fill of the text layer to 0%

You should now have a transparent text effect.

Create a Beautiful River Scenery in Photoshop
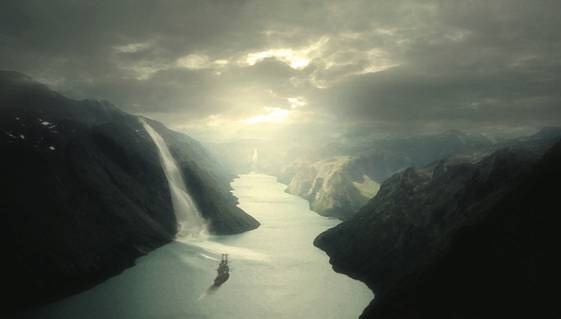
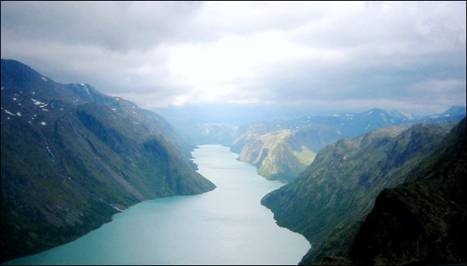
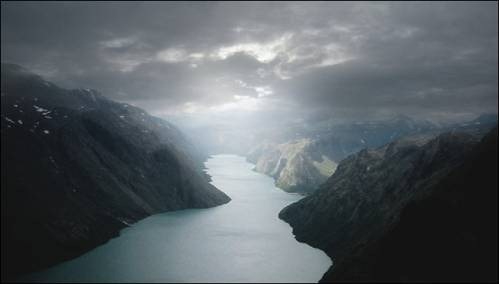
In this tutorial, we will learn how to create a breathtaking and fantasy-themed, painting-like photo-manipulation. You will learn how to create this scenery by combining images, using Photoshop brushes, then finishing it with a soft photo effect.
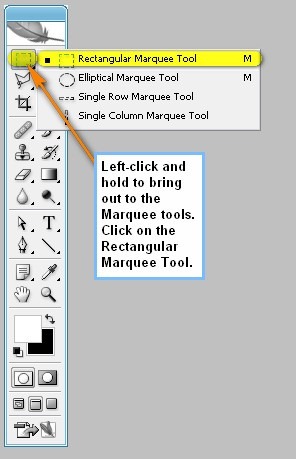 When it is activated, click on an area on the edge of the image and drag a selection area (Rectangular Marquee) on the area shown below:
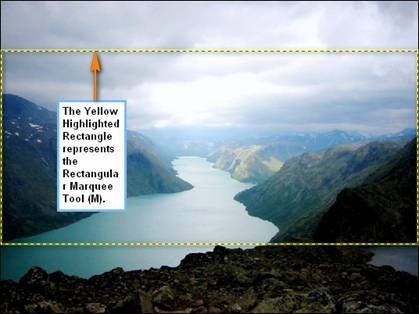 Once you’ve made the selection area, you may now move the image to our canvas. To do that, activate the Move tool by pressing V on your keyboard. Once you’re done, the mouse pointer will change and a small cross will be added to the bottom-right part of the cursor. When you see that change, left-click on the image using the Move tool and then drag the image within the selection area to our canvas.
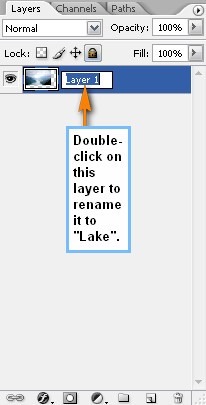
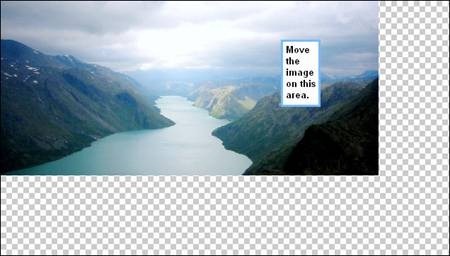 Before we proceed with the next part, we will need to rename this layer to “Lake”. To rename a layer, simply double-click on the words: “layer 2” to prompt a text box to appear. Once that appears, you may now rename the layer.
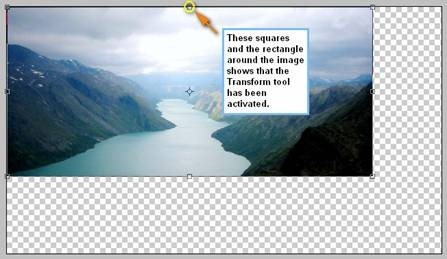
 Now we will have to resize that stock image to fit our canvas. To resize or transform the image, activate the Transform tool by pressing Ctrl/Cmd + T on your keyboard. When the Transform tool is activated, you’ll see a box around the image, with squares around it.
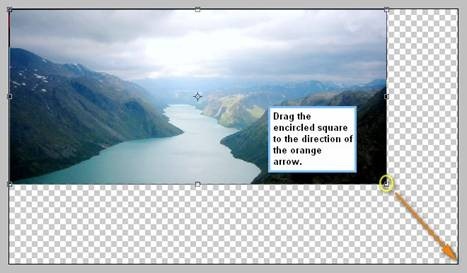
 Now to resize, simply move the square shown below to the edge of the canvas to stretch our image.
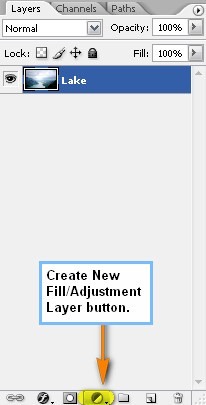
 Now that we’re done with those, it’s time we do a quick fix for this lake. On the Layer Window, click on the Create New Fill/Adjustment layer button. See image below:
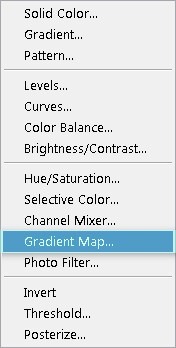
 After clicking that, a contextual menu would open – click on Gradient Map.
 Now when this box opens, do the following as shown on the image below:
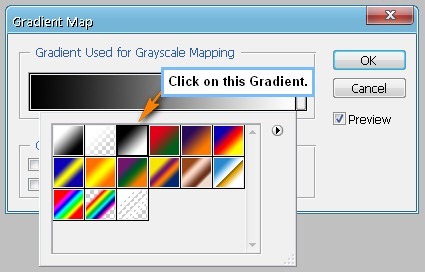 After you’ve clicked OK, you will see that the image is now a Black and White image but that’s not how it is supposed to look. We’re going for an image which has high contrast and dramatic lighting of that of a sunset, and in order for us to achieve that, we will need to make it colored. To do that, simply change the Blending mode of the Gradient Map layer to Multiply.
That could be done by clicking on the word Normal on the Layer window for a set of modes to appear. Once it pops up click on Multiply.
 The result will be:
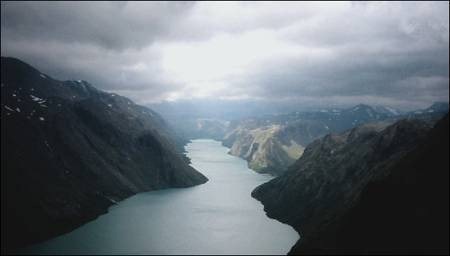
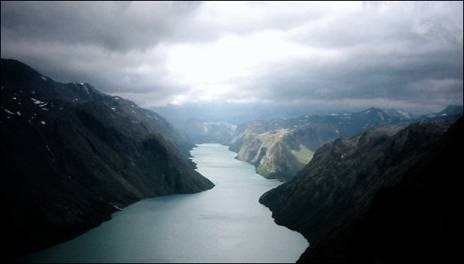 Next, let’s lessen the contrast of the lake layer. To do that, click on the Create New Fill/Adjustment layer button again and click on Brightness/Contrast from the contextual menu.
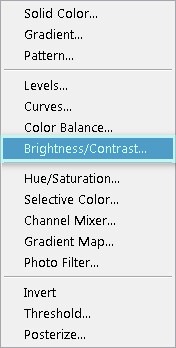 When the box opens, input the following values:
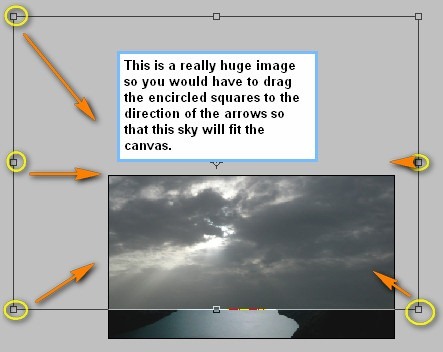
 Now that we’re done with the Lake, let’s now start adding the sky. To start, let’s open, “stockimage 10” by CSnyder. When you have that stock image opened, activate the Move tool (V) and drag it to our canvas, and make sure you put it above all the layers that we’ve created. Once on the canvas, rename this layer to “sky”. Now let us resize this sky using the Transform tool (Ctrl/Cmd + T), take note that this is a huge image so you might try to fit it first in the canvas. See the image below:
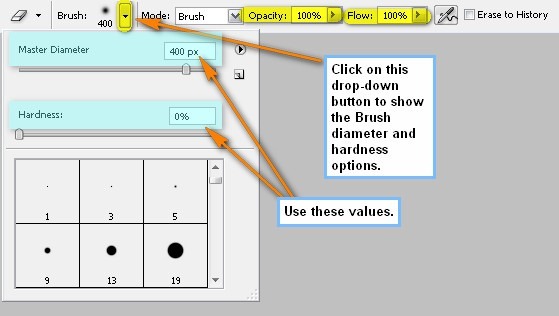
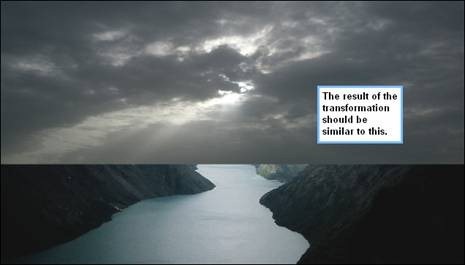 When you’re done, activate the Eraser tool (E), because we would need to erase some parts of this sky to make it blend with our lake. After you’ve activated the Eraser tool (E), input the following values for this tool through the Options window.
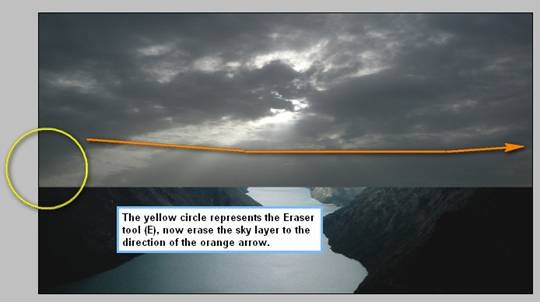
 Now we’re ready to erase. Use the Eraser Tool on the areas indicated on the image below:
 The result should be similar to this:
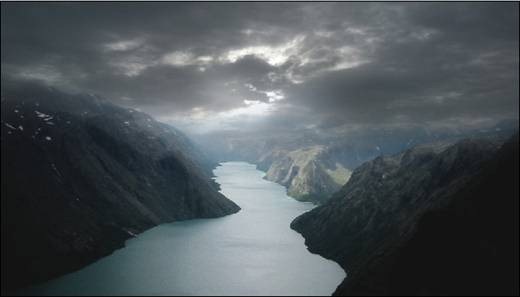 To make this sky look seamless, let us reduce its opacity to 70%.
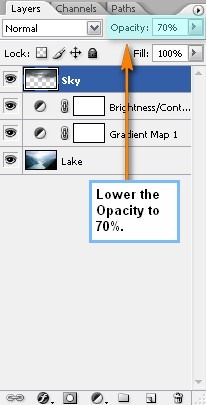 The result:
After that, let us now enhance the light on the sky. To start, let’s create a new layer by pressing Ctrl/Cmd + Shift + N on your keyboard. When this New Layer box opens, type: “Light 1” as its name. Next, activate the Brush tool (B) and input the following values on the Options window:
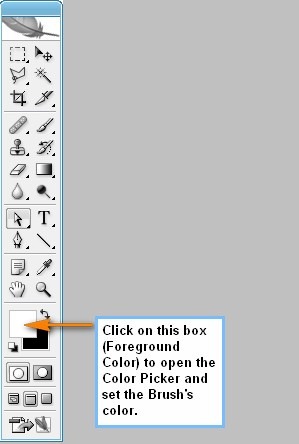 When that box opens, it would look like this:
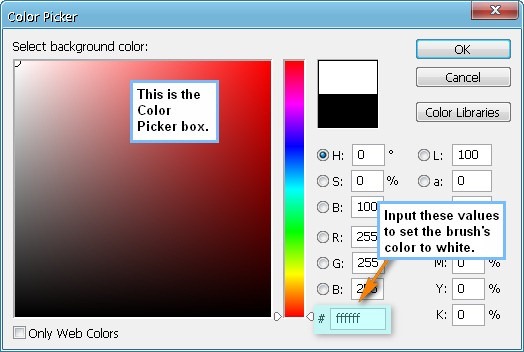 Now we’re all set to paint in some light! See image below on how to do it:
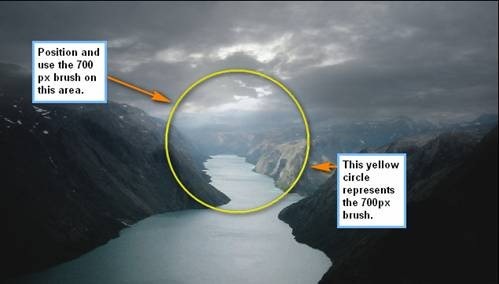 The result should be similar to the image shown below:
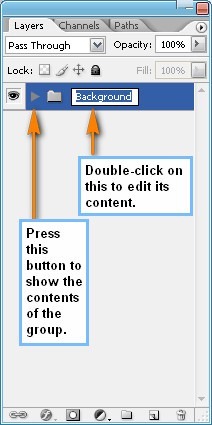
 When you’re done, select all the layers that you’ve created and the press Ctrl/Cmd + G to group the layers. You’d notice that a folder will be created; to see the layers, simply click on the drop-down button. Rename this Group to “Background”.
Note: Renaming a group is similar to renaming a layer.
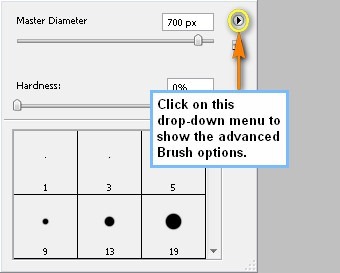
With that done, activate the Brush tool (B) and then open the Brush pack: “Waterfalls” by midnightstouch – before everything else, make sure that you have downloaded these brushes on the Photoshop Brushes directory (Adobe Photoshop > Presets > Brushes).
Now to open it, right click on the canvas while the Brush tool (B) is activated and then click on the drop-down menu to show the advanced Brush’s options. See image below:
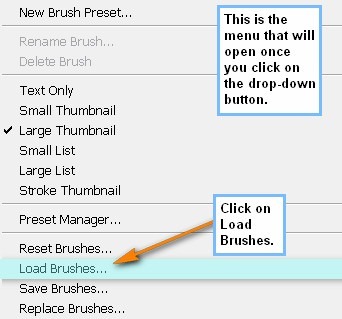
 Next, we will need to Load the brushes from the directory where we saved it.
 Use the following Brush:
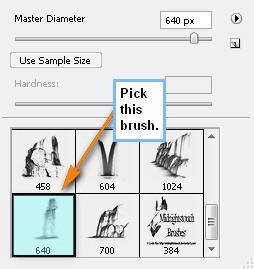 Once loaded, use the following settings for the Brush tool (B).
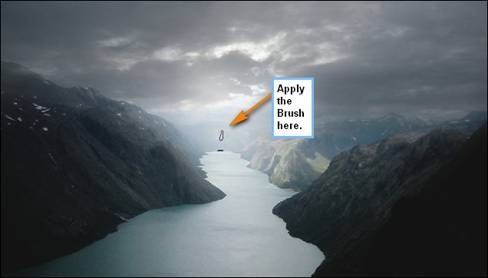
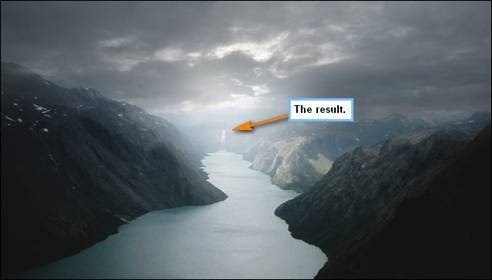 Next, let’s create another layer (Ctrl/Cmd + Shift + N) but this time name it as “Waterfall 2”. We will still be using the “Waterfalls” brushes by midnightstouch so do not Reset your brushes just yet. Right click on the canvas using the Brush tool (B) and pick the following brush:
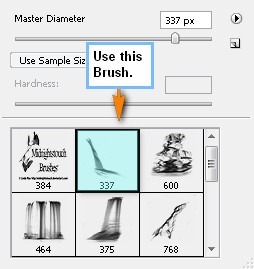 Once that Brush is active, use the following settings for the Brush tool (B).
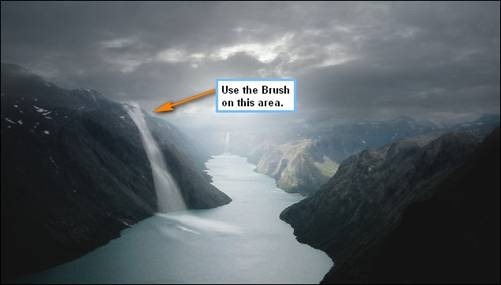 Now to make this waterfall look real, we’re going to remove the unwanted parts. To do that, we’re going to need the Eraser tool (E). Activate this tool and then use the following settings:
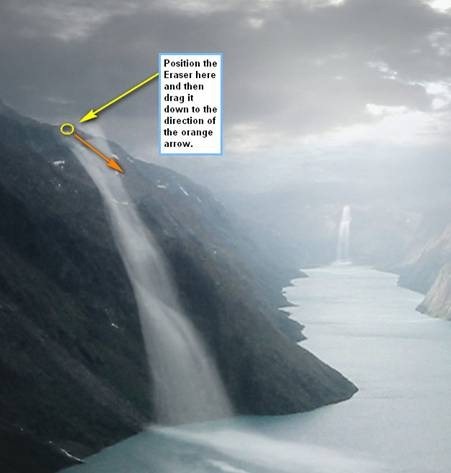
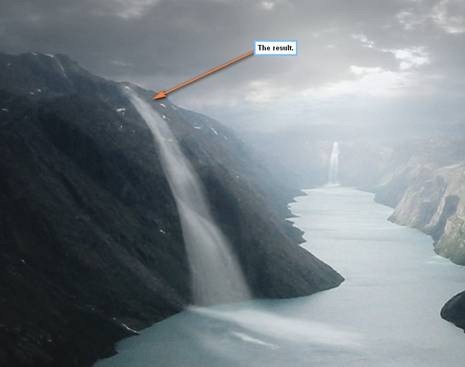 Next we’re going to add some splashes to make it look like real waterfalls. To start, let’s create a new layer (Ctrl/Cmd + Shift + N) and name it “Waterfall2splash”. Once you’re done with that, we’ll need to open the “WaterBrushesSampler” brushes by FrozenStarRo.
Remember: Right click on the canvas using the Brush tool (B) to bring up the Brush tool’s menu. Once open, click on the drop-down button to open the advanced options and once that’s open, click on Load Brushes and then locate “Water BrushesSampler”. Once you’ve loaded the brushes, find and click on this brush:
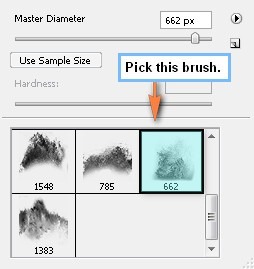 When you have that specific brush ready, input the following values for the brush tool:
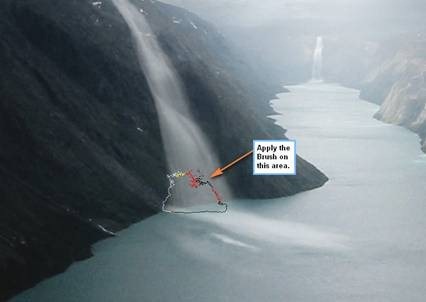
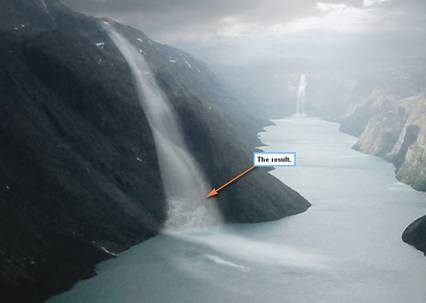 Now, let’s create another splash. Create a new layer again but this time, name it: “Waterfall2splash2”. We’re going to use the same brush that we had just used (Brush 662 of WaterBrushesSampler). Use the following settings for the Brush tool (B):
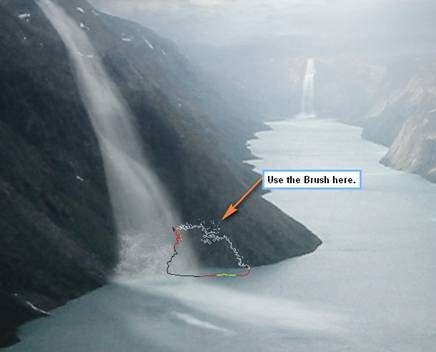
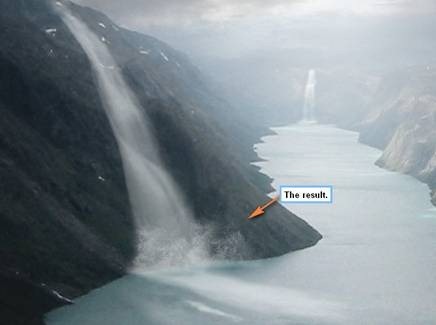
Next, we’re going to erase the excess for composition purposes. Activate the Eraser tool (E) and input the following values:
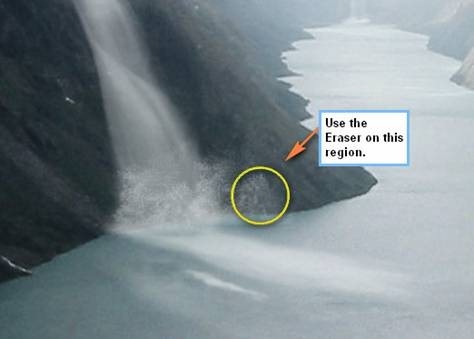
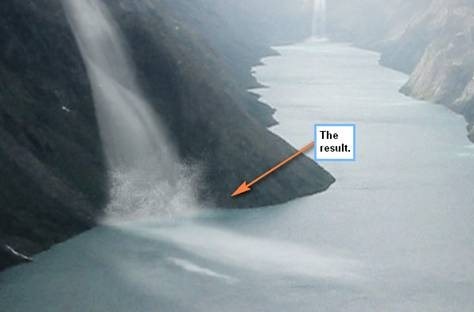 When you’re done, select all the layers that you’ve created on this step and press Ctrl/Cmd + G to group them. Name this group “Waterfalls”.
Upon moving, rename this layer to “Ship” and activate the Transform tool (Ctrl/Cmd + T) while this layer is activated and then right click on the ship to show the contextual menu. Once this menu is shown, click on Flip Horizontal. See image below:
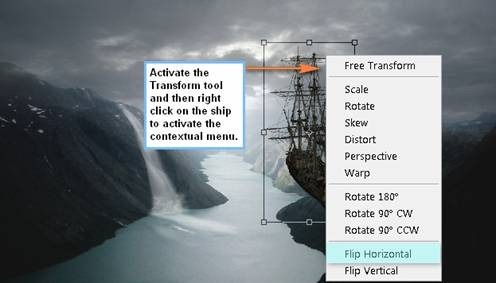
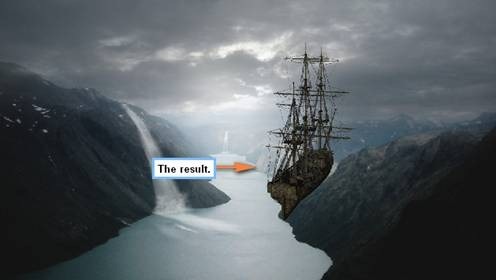 Now, we’re going to resize this ship to make it appear like it is on the lake. Activate the Transform tool (Ctrl/Cmd + T) and resize the image as seen below:
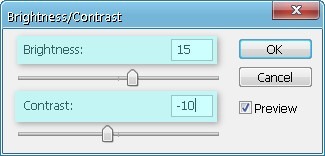
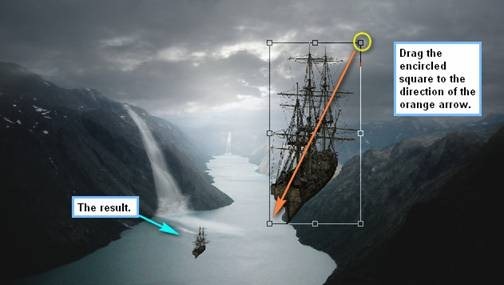 When you’re done, we’re going to adjust the Brightness/Contrast of the ship to make it blend with the rest of the images. Click on the “Ship” layer and then go to Image > Adjustments > Brightness/Contrast and input the following values:
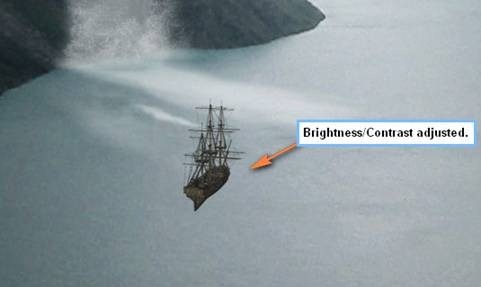
 The result should be similar to the image below:
 Now, activate the Eraser tool (E). We’re going to make the ship look like it really is on water by erasing the ship’s hull or its bottom part. Use the following settings for the Eraser tool (E):
 Erase the part of the ship as shown on the image below:
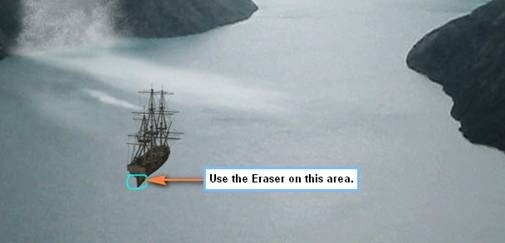
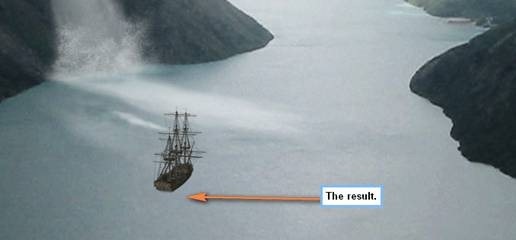 Next, the last thing we would need to do to make this ship blend with the rest of the picture is to lower its Opacity. While the layer “Ship” is selected, reduce its Opacity to 80%.

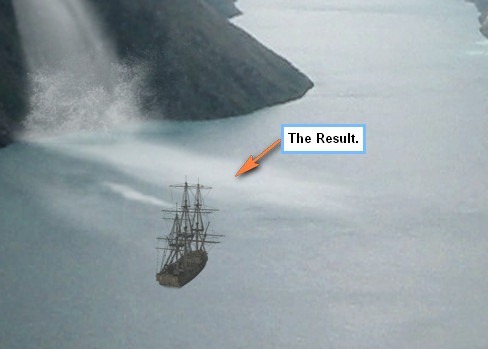 After the ship, let’s now add its shadows. Create a new layer (Ctrl/Cmd + Shift + N) and then name it “Ship shadow”. When the layer is created, move this layer below the “ship” layer. Next, activate the Brush tool (B) and Reset your brushes. To reset your brushes, do the same thing as you would with the “Load Brushes” option.
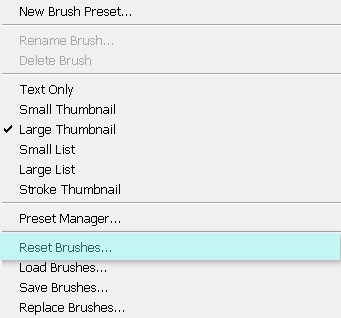 After you’ve reset your Brushes, use the following settings:
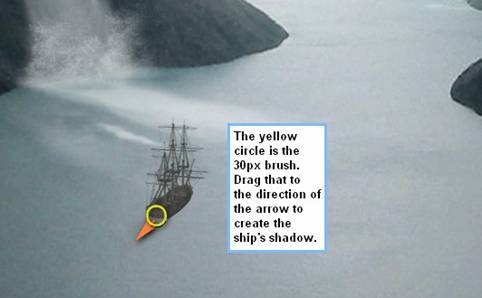 The result should be similar to the image below:
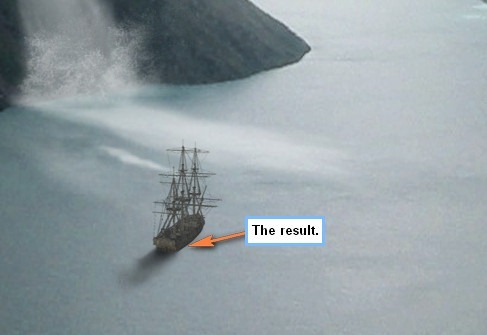 When you’re done, group all the layers that you’ve created on this step and name this group: “Ship and its shadow”.
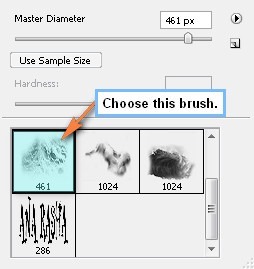 Once you’re done with that, set the Brush values to the following:
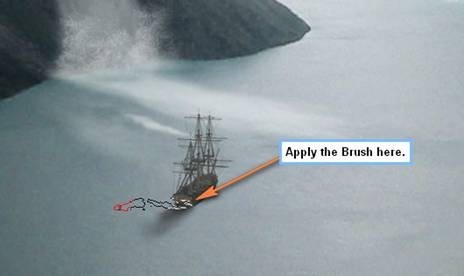
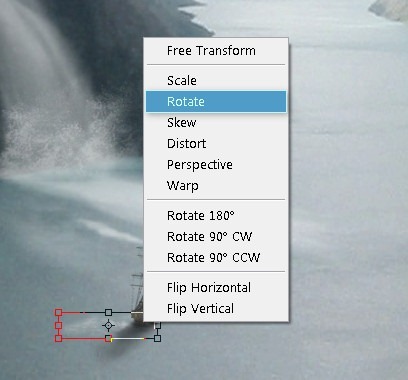
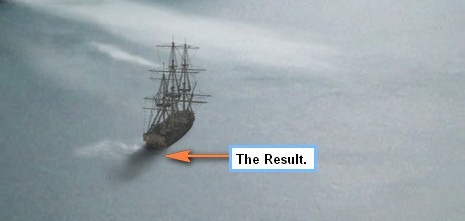 These waves definitely do not look like it came from the ship, so we’ll need to transform/rotate it. Activate the Transform tool (Ctrl/Cmd + T) and right click on the selected layer then click on Rotate.
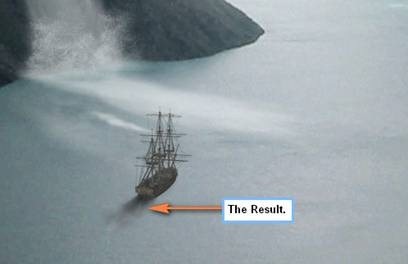
 The result should be similar to this:
 Next, let’s create another layer and name it “Waves from Ship 2”. We’re going to use the same brush (brush 461 of the “waves brush” by anaRasha). After that, set the brush to the following:
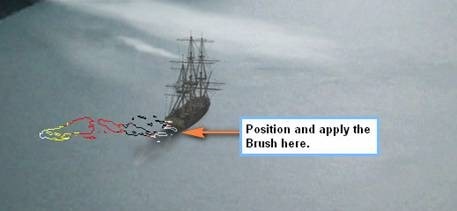 Activate the Transform tool (Ctrl/Cmd + T) and rotate it as shown below:
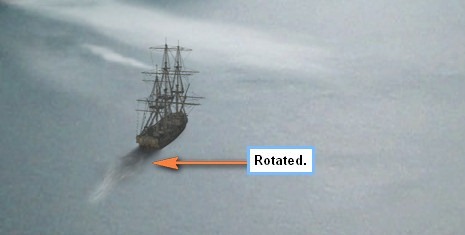 Now for the next layer, name it “Waves from ship 3” and then activate the Brush tool (B). Once the Brush tool (B) is activated reset the brushes. After resetting it, input the following:
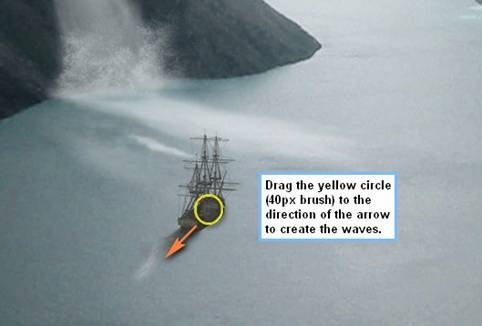 Now that we’re done, select all the layers that we’ve created and press Ctrl/Cmd + G to group them, name this group as “Waves”.
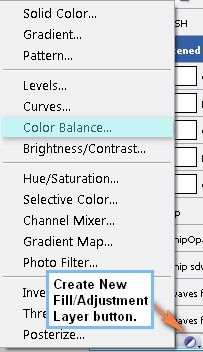 When the Color Balance box opens, input the following:
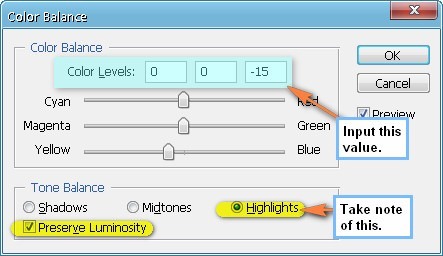
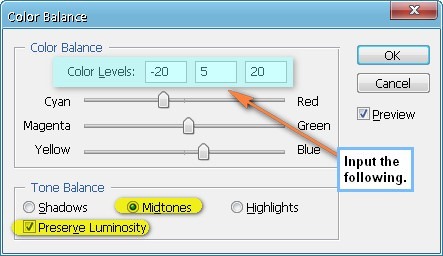 Next, create another Color Balance adjustment layer, and then input the following:
 Next, create a Photo Filter adjustment layer.
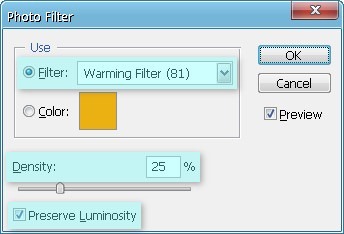
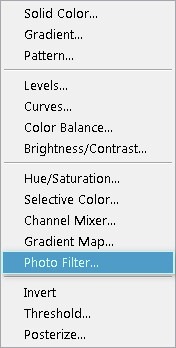 When the box opens, input the following values:
 Next, let’s create another Color Balance adjustment layer, when the box opens input the following values:
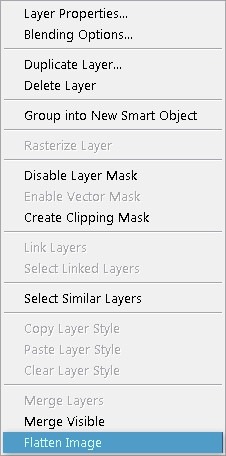
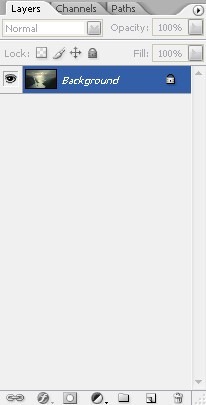
 When you’re done, we will now flatten the image or compress all the layers. To flatten the image, right-click any layer to bring up the contextual menu. Once it is open, click on Flatten Image.
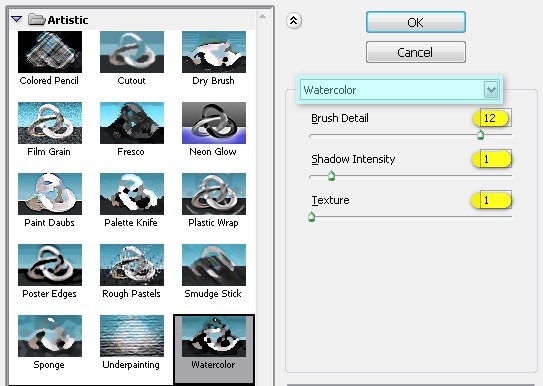
When it opens input the following:
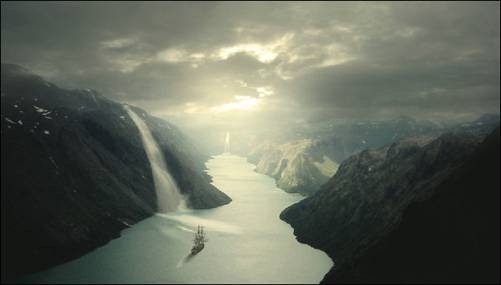
 The result will be similar to this:
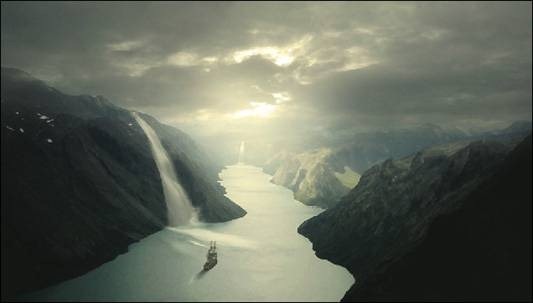 After that, we will need to reduce the Opacity of this layer to give it more detail. Click on the duplicated layer and then reduce the Opacity to 50%.
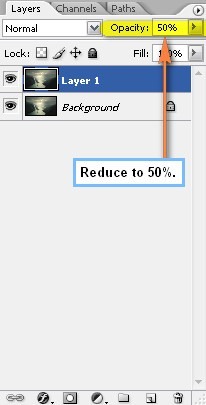

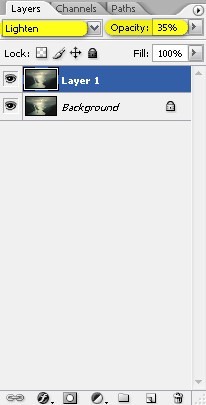
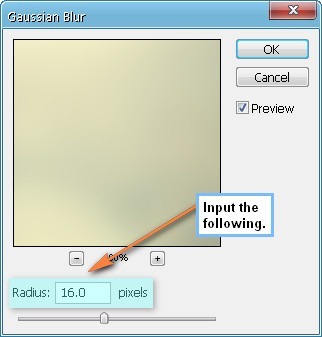 The result will be a blurry image but this is not what we want, to give it a soft glow change the Blending mode to Lighten and change the Opacity to 35%.
 The result will be similar to the following:
 Finally, when you’re done, right click on this layer and then click on Flatten image.

Beautiful River Scenery Photoshop Tutorial
Resources
- Stock: Norwegian Nature 1- RiddleSolved
- Stockimage 10 - CSnyder
- Waterfalls brushes - midnightstouch
- Water Brushes Sampler- FrozenStarRo
- Tall Ship - Alegion Stock
Step 1: Create a New Image File
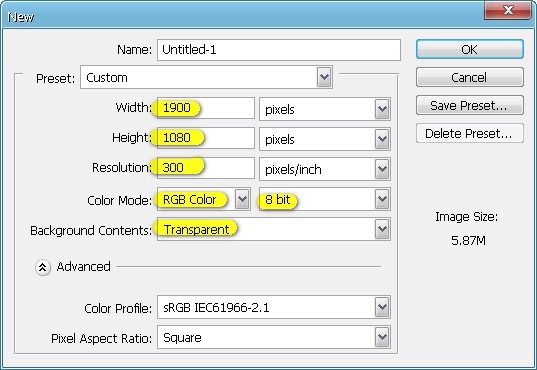
To start, let’s create a new image file, go to the Menu bar and click File > New, and then input the following values on their respective fields:- Width: 1900 pixels
- Height: 1080 pixels
- Resolution: 300pixels/inch
- Color Mode: RGB Color; 8 bit
- Background Contents: Transparent

Step 2: Create the Lake and the Sky
In this step, we will be creating the major element of our picture which is the sea and the sky. To start, let’s open the image “Stock Norwegian Nature 1” by RiddleSolved. Once the image is open, activate the Rectangular Marquee tool by pressing M on your keyboard. See image below:


That could be done by clicking on the word Normal on the Layer window for a set of modes to appear. Once it pops up click on Multiply.


- Brightness: 0
- Contrast: -15


- Brush size: 400px
- Hardness: 0%
- Opacity: 100%
- Flow: 100%


After that, let us now enhance the light on the sky. To start, let’s create a new layer by pressing Ctrl/Cmd + Shift + N on your keyboard. When this New Layer box opens, type: “Light 1” as its name. Next, activate the Brush tool (B) and input the following values on the Options window:
- Brush size: 700px
- Hardness: 0%
- Opacity: 45%
- Flow: 100%


Note: Renaming a group is similar to renaming a layer.

Step 3: Create the Waterfalls
Now in this step, we will be adding the waterfalls. To do that, we will need to create a new layer first (Ctrl/Cmd + Shift + N) and name this new layer: “Waterfall 1”.With that done, activate the Brush tool (B) and then open the Brush pack: “Waterfalls” by midnightstouch – before everything else, make sure that you have downloaded these brushes on the Photoshop Brushes directory (Adobe Photoshop > Presets > Brushes).
Now to open it, right click on the canvas while the Brush tool (B) is activated and then click on the drop-down menu to show the advanced Brush’s options. See image below:


- Brush size: 100px
- Hardness: Default
- Opacity: 100%
- Flow: 100%
- Use the following for the Brush’s color:
- #: ffffff


- Brush size: 700px
- Hardness: Default
- Opacity: 100%
- Flow: 100%
- #: ffffff

- Brush size: 20px
- Hardness: 0%
- Opacity: 15%
- Flow: 100%


Remember: Right click on the canvas using the Brush tool (B) to bring up the Brush tool’s menu. Once open, click on the drop-down button to open the advanced options and once that’s open, click on Load Brushes and then locate “Water BrushesSampler”. Once you’ve loaded the brushes, find and click on this brush:

- Brush size: 150px
- Hardness: Default
- Opacity: 50%
- Flow: 100%
- #: ffffff


- Brush size: 150px
- Hardness: Default
- Opacity: 50%
- Flow: 100%
- #: ffffff


Next, we’re going to erase the excess for composition purposes. Activate the Eraser tool (E) and input the following values:
- Brush size: 80px
- Hardness: 0%
- Opacity: 50%
- Flow: 100%


Step 4: Add the Ship
In this step, we will add the ship. To start, let’s open “Tall Ship 6” by Alegion Stock. You’d notice that this stock has a transparent background this means that you could simply transfer this image to the canvas. Upon opening, just activate the Move tool (V) and drag that ship to our canvas.Upon moving, rename this layer to “Ship” and activate the Transform tool (Ctrl/Cmd + T) while this layer is activated and then right click on the ship to show the contextual menu. Once this menu is shown, click on Flip Horizontal. See image below:


- Brightness: +15
- Contrast: -10


- Brush size: 10px
- Hardness: 0%
- Opacity: 100%
- Flow: 100%


- Brush size: 30px
- Hardness: 0%
- Opacity: 15%
- Flow: 100%
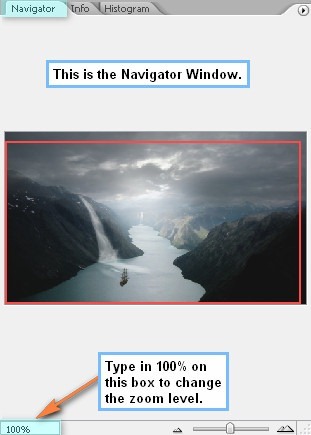
- Navigator Window: 100%


Step 5: Create the Waves from the Ship
We’re going to make the ship look like its moving so we will create waves which come from the ship. To start, let’s create a new layer (Ctrl/Cmd + Shift + N) and name this layer “Waves from Ship 1”. So that it would look realistic, make sure that this layer and all the layers that you’re going to create on this step is below the “Ship’s shadow” layer. Next, activate the Brush tool (B) and load the brush pack: “waves brush” by anaRasha. Once these brushes have been loaded choose the following brush:
- Brush size: 100px
- Hardness: Default
- Opacity: 50%
- Flow: 100%
- #: ffffff


- Brush size: 175px
- Hardness: Default
- Opacity: 50%
- Flow: 100%
- #: ffffff


- Brush size: 40px
- Hardness: 0%
- Opacity: 25%
- Flow: 100%
- #: ffffff

Step 6: Retouch the Image
In this step, we will need to retouch the image to enhance the beauty of the image. To start, let’s create a Color Balance adjustment layer from the Create New Fill/Adjustment layer button located on the Layer Window.
- Color Levels: -20, +5, +20
- Tone Balance: Midtones
- Preserve Luminosity: Checked

- Color Levels: 0, 0, -15
- Tone Balance: Highlights
- Preserve Luminosity: Checked


- Filter: Warming Filter (81)
- Density: 25%
- Preserve Luminosity: Checked

- Color Levels: 0, 0, -5
- Tone Balance: Midtones
- Preserve Luminosity: Checked
- Photo Filter
- Filter: Yellow
- Density: 25%
- Preserve Luminosity: Checked
- Color Balance
- Color Levels: +10, 0, +5
- Tone Balance: Midtones
- Preserve Luminosity: Checked


Step 7: Make the image look like a Painting
Now, we will give our image a “Painting” effect. Click on the Flattened layer (Background) and then press Ctrl/Cmd + J to duplicate it. After duplicating the layer, the focus of the Layer window or Photoshop itself will be on this duplicated layer, so go to Filter > Filter Gallery > Artistic > Watercolor.When it opens input the following:
- Brush Detail: 12
- Shadow Intensity: 1
- Texture: 1


Step 8: Give the image a soft glow
In this step, we will make the image glow. To do that, first flatten the image. Once flattened, duplicate it again (Ctrl/Cmd + J). Click on the duplicated layer and then go to Filter > Blur > Gaussian Blur. When it opens, input the following:- Gaussian Blur: 16.0px
- Lighten
- Opacity: 35%


Download the PSD
Against the Storm.zip | 29 MB
Subscribe to:
Posts (Atom)


